I love how these little satchels came out! My girls were excited about the idea from the start and went with me to pick out the yarn. Even my husband commented on the final results. I love the saturated colors and it doesn't get much better than fuzzy felted wool if you like tactile fabrics. (Who doesn't?) I love the texture and the thickness of the "fabric" on these little bags and it's not often I use oversized buttons but these purses were begging for them.
They look pretty fun, are cozy to wear, and are the perfect size for carrying a little girl's hard-earned allowance, or a few prized posessions. The strap is long enough to wear across the body, where it is less likely to slip off.
But the really important thing about the Girl's Felted Satchel is that it's made entirely using the single crochet stitch! If you've been following my How to Crochet series to brush up on your crochet technique or learning for the first time this would be a great project for you. Creating the crochet pieces for the bag is easy. The construction--seaming the strap to the bag--is a bit tricky but I've got lots of pictures for you to make it as simple as possible.
To make the satchel, you crochet a long rectangle for the body of the bag, and a narrow strip for the strap, and then seam them together using the single crochet seaming method.
I used Stitch Nation's Full O' Sheep yarn in Clementine, Passionfruit and Aquamarine.It's 100% peruvian wool. Such great colors and great together!
You could add a felted flower to the flap too if you wanted, or embroider with a contrasting yarn before or after felting. I think these little felted satchels have great potential.
Click to view the tutorial for making a Girl's Felted Satchel.
How-to tutorials, patterns, giveaways, reviews and interviews to make certain you are smitten.
CHILD'S FELTED CROCHET SATCHEL
You will need:
- 1 skein Stitch Nation Full O' Sheep yarn in your choice of color for the bag (Color A). I used Aquamarine for the turquoise bag and Passionfruit for the amythest colored bag.
- 1 skein Stitch Nation Full O' Sheep yarn in your choice of color for the strap (Color B). I used Aquamarine for the turqoise strap and Clementine for the orange strap.
- 1 skein Stitch Nation Full O' Sheep yarn in your choice of color for contrast edging (Color C). I used Passionfruit edging on the turquoise bag and Clementine edging on the amythest bag.
- Size "L" 8.00 mm crochet hook
- Tapestry needle for weaving in the ends
- Note: if you are going to try a yarn substitution it's essential that you use 100% wool so it will felt. Wool blends or "superwash" wool will not felt...
Abbreviations:
- Chain: ch
- Single Crochet: sc
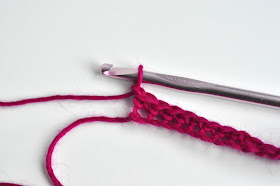
With yarn "Color A" chain 21.
Row 1: Skip the first chain stitch...
...and work one single crochet in the next chain stitch.
Work one single crochet in each chain stitch to the end. (20 sc)
Chain 1.
Turn.
Row 2: Work 1 single crochet in the first single crochet...
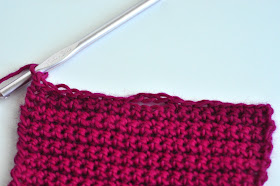
...and 1 single crochet in each subsequent single crochet to the end of the row. Chain 1. Turn.
Repeat Row 2 until the piece measures 16.5 inches.
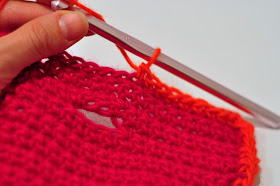
Now in this next row you will make a button hole. Starting with the first single crochet in the row, work 8 single crochet.
Chain 4.
Skip the next 4 single crochet stitches and work 1 sc in the next single crochet.
Work 7 more sc to the end of the row.
Repeat Row 2 for four more rows. Fasten off. (Fasten off by cutting the yarn leaving a tail a few inches long, chaining 1 and pulling the yarn all the way through to form a knot.)
TO CROCHET THE STRAP:
Using yarn "Color B" chain 7.
Row 1: Skip the first sc and work 1 sc in the next sc.
Work 1 sc in the next sc and each sc to the end. (6 sc)
Chain 1. Turn.
Row 2: Work 1 sc in each sc to the end of the row. Chain 1. Turn.
Repeat Row 2 until the piece measures 47 inches.
(Note: I wasn't sure how much the strap would shorten after felting; for a younger child I would make this a few inches shorter--43 or 44 inches.)
Fasten off.
TO CONSTRUCT THE SATCHEL:
Measure 6.5 inches from one end of the strap and align with the end of the bag that doesn't have the buttonhole.
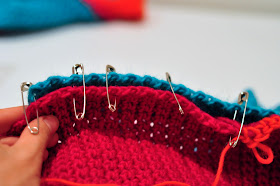
Using safety pins or stitch markers pin the side of the bag to the side of the strap for 6.5 inches.
Find the row on the bag that lines up with the end of the strap and place safety pins at each end of the row. Place another pin on the opposite end of the row 6.5 inches from the end of the strap. These markers will help you correctly line up the strap on the other side of the bag so the front, bottom and back of the bag fold neatly along the same rows.
We're going to use a single crochet stitch to seam the strap to the bag. Because the seam is decorative and worked in a contrasting yarn color, yarn "color C", it is going to be on the outside of the bag, so we will seam it by placing these bag and strap pieces "wrong sides" together (you would typically place right sides together when using this seaming technique--see this post). There isn't actually a discernable "wrong" side to these pieces but you might have a side you prefer so call it the "right" side.
With yarn "Color C" on your hook, work a single crochet starting in the two holes in the strap and bag at the end of the bag piece where your safety pin or stitch marker is inserted.
Continue working along the edge of these two pieces in single crochet to seam the strap to the side of the bag (work one single crochet in the end of each row)...
...until you come to the end of the strap. (You have just worked along one edge of what will be the front of the bag.)
Now bend the bag piece around the bottom of the strap and pin it to the bottom of the strap. You won't want to stretch the bag by pulling it too tightly around the bottom corners of the strap. Use a safety pin to mark the opposite end of the rows on the bag that are aligned with the bottom corners of the strap so you can mimic this on the other side of the bag.
Work 2 single crochet in the holes at the corner of the strap to make the turn.
Continue working single crochet along the edge of the bag and strap along the end of the strap.
And work two sc in the opposite corner at the end of the strap to turn again before...
...working up the opposite side of the strap. (You are now working up what will be the back side of the bag.)
Use safety pins or stitch markers to line up the bag with the opposite side of the strap, being careful to place the last pin at the same row as the beginning of your crochet seam on the opposite side of the strap.
Work single crochet to finish seaming the strap to this back side of the bag. Stop where your final safety pin/marker was opposite the beginning of this seaming work on the front side of the bag.
Now you will let go of the strap piece and continue the single crochet edging along the bag: work 1 sc in the end of each row. This is the section of the bag that will form the flap of the satchel.
When you come to the corner of the bag work 2 sc in the end of the last row to make the turn.
Continue working single crochet along the short edge (the flap) of the bag.
Make the turn at the corner of the flap with 2 sc and work down the other edge of the flap piece until you come to the marker you placed on the opposite end of the row where you finished seaming the strap on the back side of the bag and began the edging on the flap. (That sounds complicated--I hope the picture helps! What you want to do is make certain your flap isn't hanging crooked by having it join the strap at opposite ends of the same row.)
Now pull on that working loop you have on your hook so it gets really big and the single crochet work you did doesn't accidentally get pulled out, and set the hook aside for a bit.
Now align the other end of the strap with the back side of the bag by meeting the end of the strap with the marker at the corner of the back and bottom of the bag. Make certain you aren't twisting the strap as you do this. Pin it in place adding additional markers on the opposite ends of the rows where the strap will be meeting the back of the bag.
Fold over the strap so the "wrong sides" of the strap and bag pieces are together just as you did with the other end of the strap.
Now picking up where you left off with the flap edging, work in single crochet to seam the back edge of the bag with the strap.
Follow the directions provided above for working along the bottom corners and edge of the strap and bottom of the bag, and back up the front of the bag. Be sure to reference your safety pins/markers to be certain the bag is folding at the bottom along the same rows so it isn't crooked.
Fasten off. Weave in your ends. You've got yourself a satchel!
It's pretty cute like this. But it gets so much better after felting...
TO FELT THE SATCHEL:
To felt the satchel, toss it in your washer with a couple old towels (there's a chance of the color bleeding) and set it on a normal cycle using hot/cold temperatures (hot wash and cold rinse). The towels will help with the agitation. Add a couple teaspoons of dishwashing detergent (this is recommended to work more effectively for felting than washing machine detergent). I ran my satchels through this cycle twice and love the result! You could do it once or twice more and I expect it might shrink a bit more.
When you take the satchel out of the washer you can stretch and shape it a bit if it needs it. I stuffed mine with plastic bags while they dried. Probably not necessary but I wanted to ensure they had a good boxy shape to them.
Here is my before and after photo.
Before felting the satchel measured 7"x7.5" and after it measured 6"x5.5". I think it's interesting that it shrank more along the length of the rows than the height of the rows. Always something to learn...
 |
Sew on a large button to close the flap and make a girl's day!


Your girls are adorable!! I can't wait to try this. It looks pretty easy and the finished, felted satchel is so cute. Love the colors. A other winning tutorial! BTW - I've made 2 of your cowls already. I love the pattern and the texture.
ReplyDeleteSuper cute! Girls and satchels ;) (the girls are getting so big!) Very nice tutorial ~ so good to see women like yourself taking the time and energy to put these tutorials together ~ I dare say you are responsible for a whole bunch o'new crochet enthusiasts!
ReplyDeleteI love the bright colors that you used and can't wait to try this. Thanks so much for the tutorial with the wonderful pictures...I hope you don't mind if I pin this?
ReplyDeleteI absolutely LOVE these! (They're almost as cute as the models.) I bookmarked your tutorial to try with my mom when she's here next week. Can't wait!
ReplyDeleteLove the colors! Thanks so much for putting these tutorials together. I'm just learning to crochet, and projects like these aren't too challenging, which is a plus point when you're a beginner like me. Already did several versions of your ruffle scarf! Thanks again! I'm definitely pinning this!
ReplyDeleteHi Anneliese,
ReplyDeleteWhen I first saw the bag, I thought it was going to be a bag that you wanted, and then tried to recreate. But to see that it's just a bag you created on your own is amazing; you really chose great colors for the project. Great Job!
-Brandyce P.
Oh these look like such fun!!! And your girls are so precious! So much fun to see them modeling your creations! I always wondered how to felt something without distorting it and never knew it was so popular! I accidentally felted a sweater my grandmother made for my mom that was passed down to me when I was a teenager - oops! I didn't realize it shouldn't go in the washer! Wish I still had it! I like the way these purses turned out! I was afraid to try it before but now I will!
ReplyDeleteNot quite ready to try crochet but will be definitely making these out of fabric for my girls....show me a girl who doesn't love a bag. I will learn crochet one day :)
ReplyDeleteLove these! I have 2 little girls and this would be fun to do.
ReplyDeleteDarling! Love the fun colors and the fuzzy yarn.
ReplyDeleteThought it over last night and I think I am going to try these (probably in something a little less pink!) for two little boys ~ adventure/exploration satchels! My grands are 2 and 4 and would love these ~ maybe add a magnifying glass and compass?!
ReplyDelete@Paula: What a fantastic idea!
ReplyDeleteSo cute! I love the colors and am totally inspired to make something similar in a grown up size :).
ReplyDeletePlease include a pattern that can be printed readily, not just one strung out along several pages, for those of us who don't need the tutorial and need to pay for each page we print. Thanks!
ReplyDeleteHow many chains do I do
ReplyDeleteHow many chains do I do
ReplyDelete@Taryn: I just saw that it's easy to miss the first line of this pattern as it's before the first photo and flush left, rather than centered. You chain 21. thanks!
ReplyDeleteCame across this the other night and just had to have a go :D really good tutorial My bag is in the washer right now felting can't wait to see how it comes out , thanks for the brillo instructions!
ReplyDelete