We celebrated Tess's birthday a couple weeks ago with a lot of pinks and golden yellows and flowers. I'll share all the details soon but wanted to share what was for me the creative apogee: ribbon and flower crowns. A flower crown for the birthday girl and ribbon crowns for her guests. So fun!
I wasn't quite sure how to make them until late one night I came up with the perfect supplies! The crowns had to be flexible enough to be comfortable but stiff enough to hold a nice round shape, and I wanted to sew flowers on them, besides.
These took less time than I thought and I love the way they turned out. I share all the details below. Though I made these myself prior to the party, this would be a great craft for girls five and up to make at a party!
Please click through for the tutorial.
RIBBON AND FLOWER CROWNS TUTORIAL
You'll need:
- Boning (such as this by Dritz--the stiff but flexible stuff one would sew into a corset)
- Floral tape (this is a bit stretchy and sticky, which works perfectly)
- Assorted cloth ribbons--a variety of satin and sheer is best--between 1/4" and 1/2" wide
- Fabric glue or other adhesive
- For the flower versions: a variety of silk flowers and needle and thread
Start by cutting a piece of boning material the proper length for your girl's head circumference (20"-21" worked for my girls) plus 2" for overlap. Form a circle with the boning material overlapping 2" and use fabric glue to secure.
Now take floral tape (which is flexible and stretchy and perfect for this) and wrap it around the overlapping section for extra security. (If you are have girls make their own crowns, I would complete this much of each crown before the party and then hand them over to your girls to complete.)
Choose the ribbon you'd like to use for your foundation color (you'll need about three yards) and tie a knot with it around the crown at the end of the floral tape.
Now wrap the ribbon around the crown. The more you overlap the more ribbon you'll need but you may want a good amount if you are using a sheer ribbon. There's no rule here--just do what looks good to you.
When you have wrapped the entire crown secure the ribbon by knotting it with the first knot and cut the ends so they are about 1.5" long. Now use this ribbon (or similar) to add four more ribbon knots (use a double knot or square knot) evenly spaced around the crown.
Pick another ribbon and add knots between your first knots. BUT LEAVE SPACE BETWEEN TWO OF YOUR FIRST KNOTS FOR TYING LONG RIBBONS TO HANG DOWN THE BACK. I used a wide, sheer fuchsia ribbon next. I think it helps to start with your widest ribbons first...
Now add another ribbon evening spaced around the crown. I made little bows this time. A mix of bows (with a double knot to start) and knots looks great.
Finally, tie long ribbons on the back section (in the space you left blank between two of your first ribbon knots) to hang down the back. I took 1 yard pieces and tied them around the crown (with a double knot again) so they ends hung pretty evenly. I tied on eight long ribbons.
If you are making ribbon crowns you've just finished one!
To make a flower crown you will build on this ribbon crown...
Pick a selection of flowers and lay them around your ribbon crown to determine what arrangement you like. I centered the flowers over some of the ribbon knots and bows. I was going to use two different larger flowers and one smaller but I ended up simplifying and using just two different flowers.
Pull the flowers off their plastic stems and trim the plastic base so it is very short (but not so short that the flower falls apart--look to see how it's attached).
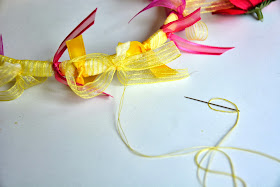
Using a needle with a double strand of knotted thread, stitch through one of the bows or knots as well as the material covering the boning.
Then use the needle to pierce the plastic base of the flower. It takes a bit of work to get the needle through but it isn't too difficult--you could use pliers if you would like. Pull the thread tight so the flower is tied to the flat front of the crown (again, using boning for this is so perfect because it provides a flat base for securing the flowers!).
Now stitch through the ribbon, the material covering the boning, and the flower petals numerous times working all the way around the flower.
Stitching all the way around this way will secure the flower to the crown, and prevent the flower from falling apart (which sometimes happens with these silk flowers when they are taken off the stems). So much better than glue!
Repeat this process with all of your flowers.


LOVE this! Now I just need to wrassle me up some little girls... :-)
ReplyDeleteYou have the BEST ideas!!!
ReplyDeleteLOVE them!!! Now I need to find a good reason to make MYSELF a pretty flower-crown..... :-)
ReplyDeleteCarly
x
I love the one with the ribbon taggies. I have shared this on my Magical Things Fairy Day Roundup post.
ReplyDelete