I had in mind for Tess's birthday party lots of brightly colored glass. In pinks and yellows, specifically, to coordinate with the party colors. I hunted a bit on eBay and Etsy and didn't find the right thing (or the right thing at the right price) so I decided to try and make my own colored glass cake stands with Martha Stewart Craft's Glass Paint.
It was surprisingly easy! And inexpensive thanks to some cut glass plates I found at the dollar store.
I clustered a pink and yellow cake stand I made myself with another I purchased and it was a fun way to display some little cakes for Tess's party. The birthday girl agreed!
Click through for the tutorial to make your own!
You'll Need:
- 1 cut glass plate
- 1 cut glass bowl, cup, or lid (I found a candy dish lid) for the base
- 1 2 oz bottle of Martha Stewart Liquid Fill Glass Paint in the color of your choice
- large jelly roll pan and wax paper or parchment paper for working
- paint brush
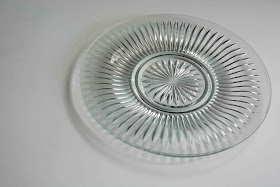
I found these 10" cut glass paints at my local All a Dollar for $1 each! You will need one glass plate and one other piece to use for the base--a cut, a lid of some sort, or a bowl.
Invert the plate on a glass above a parchment lined jelly roll pan. This will make it possible to paint the underside of the plate and collect the drips in the pan.
You'll want to paint the underside of the plate so that the right side is still usable for food (the paint is "non-toxic" but not officially "food safe"), and because any imperfections in the paint won't be noticeable if ti's on the underside.
The Martha Stewart Liquid Fill Glass Paint dries transparent and is the consistency to fill large areas contained by a border. In the case of this project much of the paint will be dripping off the edges, which is fine. It's a technique similar to glazing a cake! Let the paint do the work and don't fuss with it so it's a smooth finish. Start by filling the center of the plate. (I found this video tutorial at Michael's helpful.)
Squeeze the paint bottle to fill the entire bottom center of the plate.
Then move beyond any ridges and start filling the outer areas. I squeezed the paint bottle at the tops of all the radial grooves and let it run down towards the edges of the plate.
You can use a brush to lightly push the paint around to areas where it's not naturally running. I also scooped some of the large paint drips and reapplied the paint in areas where it didn't cover the plate.
When you have filled all the areas of the plate with paint it should look like this photo below.
This is a good time to pop any bubbles in the paint so they don't dry in the finish. It's also a good idea to babysit the drying for a little bit to remove the drips off the edges with your paint brush. Otherwise you'll have some paint bumps along the edge of the plate.
Follow these same steps to paint your base piece for the cake stand. (Paint the inside or reverse side of what will show when it's attached to the bottom of your plate.)
The follow the directions on the Martha Stewart Liquid Fill Glass Paint for drying and curing the finish. (I used the oven method once the paint had dried, which worked great.) According to the instructions the painted finish should hold up well with hand washing.
Once your pieces are dried and cured you can glue the base to the bottom of the plate with an adhesive such as E6000. I put the glue on the top of the base and then centered the plate on top of it and added a bit of weight to help it adhere.
And there you have it! A custom colored glass cake stand for your next event. Enjoy!


What a clever idea - the look great clustered together like that! :-)
ReplyDeleteCarly
x
Great idea! You always amaze me with such fun ideas!
ReplyDeleteHow amazing and pretty is that! I must tell my daughter as she is always entertaining. Thanks so much.
ReplyDeletevery pretty!
ReplyDeleteWonderful idea and a great tutorial- thanks so much!
ReplyDeleteWow, such a great tutorial. I wouldn't have thought that these plates started out clear. I bet your daughter was delighted with these at her party.
ReplyDeleteSo pretty! The colors you chose would be gorgeous at spring and summer parties! Thank you for the how-to.
ReplyDeleteCould this really get any more fun! Truly awesome, we love your creativity and the simplicity of your projects! Thank you so much for your wonderful post!
ReplyDeletewww.ananasa.com - Home For Handmade
I loved playing with glass paint when I was a teen... I'm going to have to go looking for some plates now! Thanks Anneliese :)
ReplyDeleteSheree
That is very creative!! I made something similar to this for my daughters birthday! You should check it out! Very simple and yet so adorable!
ReplyDeletehttp://www.themessymomsaga.com/2012/07/pinterest-inspired-birthday-party.html